Showing posts with label battery disassembly. Show all posts

Thursday, April 11, 2013

Upgrading to MP3

A big Hi to all my readers! I've been really busy the last few days,unfortunately it was work related not passion related, so I was unable to post anything new. But now, I will love to tell you about the something I did to my car last summer.
Basically, I got tired of burning CD so that I have some sort of music compilation to my liking, and also, I am one of those persons who get tired of a song pretty fast. So I decided it was time to upgrade my trusty old HU 603 to be MP3 capable.
So I started scouring the net for alternatives, till I found this: 

I know, I know, it's made in China. But I decided to go ahead and purchase it nevertheless against my better judgement maybe because it was readily available in Romania at a relatively low cost and fast shipping.
The installation was pretty easy, requiring only to remove the HU unit (naturally), AC and some other trims. Of course I removed the battery connectors first. As far as cable modifications go, I only had to connect the power cable of this unit to the power cable of the car and isolate the wires (easy job even for an electronics noob like myself). The kit came with a pretty useful manual explaining which wire is the power in my car. This particular model uses a connector cable that fits with the CD changer input jack and requires disconnecting the CD changer (if available) and loosing it's functionality. Trust me, you don't need it anymore after this upgrade.
Unfortunately I don't have any pictures about how to remove the AC, HU and other trims, but I'm sure with future projects I will make some.
I decided to place the main unit in the center console, so I had to remove the trims all the way to that place. The plastic trim snapped off easily. The connector which connects the HU to the main MP3 unit was luckily long enough, although maybe it could have been another 10 cm longer. 
Here's the end result:
The MP3 unit can use a USB Stick, a MMC card or it can connect to your mobile phone using a standard 3,5mm jack.
 here is where the connector comes out from beneath the plastic trims. As you can see, no cutting of the trim was necessary 
 another angle
Here is a picture of the cable going under the plastic trim of my gearshift lever
 I draw with a red line the path of the connector under the plastic trim. The most tricky part was to be sure it doesn't impair the gear shift (especially when in reverse).
Now we have almost limitless music in our car. Definitely worth the investment. One last note, it appares that this device in particular can not read very long MP3 (like a MP3 file of a full concert or something similar).
So, what do you think? Tell me if you consider a project like this and, if your answer is yes, tell me how can I help you!
Till next time, safe journeys!

Sunday, March 31, 2013

Volvo S60 DIM disassembly

A big hi to all my readers! When I created this blog, I had one thing in mind, that being sharing with all of you my ideas of possible upgrades to my Volvo S60, and also to help my readers when they begin their projects. Each time I upgrade something from now on, I will also try to post a tutorial. That being said, I now open the DIY Tutorials section, with my first tutorial regarding Volvo S60s DIM or Data Information Module (the instrument cluster) disassembly.
My first step when I start a project involving the electrical equipment is always to take of the leads to my battery. However, considering that the Volvo S60 has the battery in the trunk, and under a plastic shield which is rather hard to take out without taking out the spare wheel, I disconnect the leads under the hood.
You can find them under a small plastic door attached to the fuses box. Unscrew the bolt and you are good to go.
Secondly, go in the car and place the steering column in the most outward and downward position. If you have small hands and are confident that you will not scratch your cars trim you can skip this step, but bear in mind that the work space for this project is pretty small.
Now we start taking out the outer plastic rim surrounding the DIM. You need a firm but soft hand. All you need to do is to pull outward and up the rim using both your hands witch you place on the upper side of this plastic rim.
After you did this, your dashboard should look like in the picture above. Now, the bottom part of the plastic rim is taken out in a similar fashion. You place your hands right above the steering column and place your fingers in the small opening just above it. With a firm upward pull, you should have now disconnected the plastic rim. 
Final note about the plastic rim. It will still be attached with 3 evenly distributed plastic clips against the small plastic cover of the steering wheel (picture below)
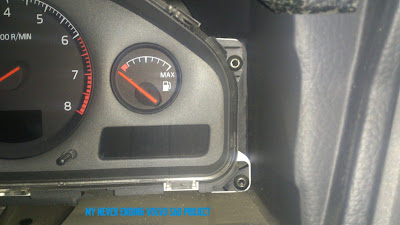
Pull them out gently, and your done. Now, your dashboard should look like this. The DIM is fixated with 4 torx T25 screws. Yes, there is a lot of dust in there too, mainly because, I never taken the DIM out before and the car is 10 years old, and secondly, I'm sorry to say there is a lot of dust in Romania.
 2 T25 screws on the right.
  and another 2 T25 screws on the left.
All you need to do is to unscrew them. Careful not to drop the screws. You're almost done. Next, pull gently the DIM out and place it face down against the steering wheel like in the picture below.
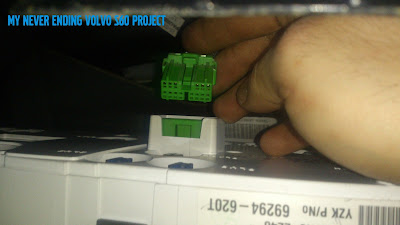
Find the green DIM connector located approximately in the middle of the clusters back panel. You can already see it in the picture above, and the next pictures below.
 Now disconnect it by pressing the small protuberance on it and pulling it out.
You have now successfully disconnected your DIM.

Part 2 of the project is how to take apart the DIM.
The DIM is composed of 3 parts that are attached together by plastic clips. There is the electronics part which is located in the white plastic casing, the black plastic casing which is the part where all the kph and revs, etc are painted upon and the final part is the lens. Using a Flathead screwdriver you can gently separate them. As you can see in the picture below, there are 3 black clips and 4 transparent clips on the bottom which have to be undone.
 On the upper side of the DIM there are another 3 clips that hold the white electronics part. Undo them gently. Now you have access to the electronics module.
 lifting the lens and black trim of the instrument cluster.
 The lens is attached to the black plastic part by 5 transparent clips. Undo them gently, and be careful about the center one, I broke a sweat trying to remove it
Well, that's about it. Now your DIM is disassembled. To reassemble it, press all the parts carefully back, and follow all the steps back. Don't forget to reattach the green connector and the leads to the battery and your all done.
I wish to thank my brother-in-law for helping me (you can check his games site if you like) and, of course my fiancee for cleaning up inside the car where all the dust was (check her cosmetics website or her blog)

Well, I hope everything was clear and helpful. If you encounter problems, contact me or write me a comment. Also if you like my work, keep reading and let me in your ideas by writing a comment below.

Till next time, safe journeys!