Monday, May 12, 2014

Behind blue eyes


Hello again!

As you may have read, I really want to facelift my car. I've made a few steps in that direction. Now, it was time to do the headlight.
So, this post is the last time we will see my car looking like this:
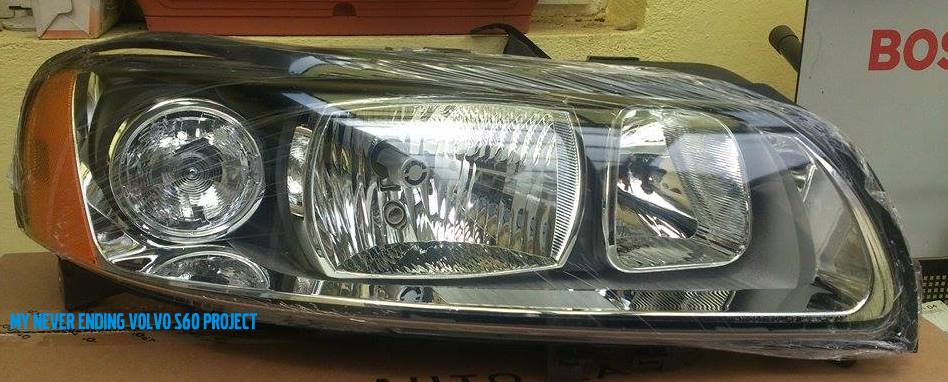
What I did first? Well, I started by buying the new headlamps. I really wanted the ABL (ACTIVE BENDING LIGHTS) models but they are so expensive and in the end the bending function will not work. So I settled for the halogen 2005+ model.
The new pair of headlights were nice and all, but I was still haunted by the look I really wanted, but fortunately I have a friend that works at a specialist shop that told me he could make them look closer to the 2007 ABL headlights and make them bi-xenon by adding a projector lens. So, I agreed.

First step was to disassemble the headlight glass so that the projector could be placed. The glass is held in place with some sort of industrial adhesive, nothing a little heat from a professional heat gun can't handle. Of course you need a pair of strong but steady arms to complete the separation.
Here's how it looked after removing the glass:
We also removed the outer chrome trim surrounding the inner headlight that was held in place by a few small clips. This step is optional but it assures that you don't let any of the industrial glue to land on this chromed part.
Afterwards, we removed the metallic guide and assembled the projector lens.
The lens are Morimoto Black Series and they fit perfectly in the original bulb socket. They fit H11 bulb. 
All was needed now was to make them look better and not out of place so we used a no name chrome trim.
After wiping all the finger marks it was time for the heat gun again to place back the glass and to seal it.
This modification of the headlamp left me without a park light, so I decided to move it to the side on the orange reflector area (like the US models).
All of the steps mentioned above were done on the other headlamp as well.
All what was left to do was to buy a pair of H9 halogen bulbs for the high beam (although I now had bi-xenon, I still wanted the close to stock look). 
So after a little trip to a 24/7 parts shop, I returned and it was time to put the headlights on the car. So, we needed to make a few modifications to the wiring. I also draw a diagram because I only managed to take one blurry picture (I was holding one headlamp with my leg, bended over the the engine compartment and took the shot). I recommend, however, to do this part at an electronist shop, or at least, if you don't have the experience, to go to an electronic expert. This photo is for the right hand side (passenger side) headlight.
If you'll like to see a short video from that day, follow this link.
Also if you have any more questions regarding this topic, please let me know in the comment section or on my facebook page.
I should mention now, that all the little fiddly work was done by my wonderful friend Grigoras Ionut whose hands are golden and let's not forget the rest of the team at CARSX. It's because of them my car looks like this now:
Thank you all!
Safe journeys everyone!
  

Sunday, May 11, 2014

Volvo S60 CCM disassembly


Hello again!

Today it's another DIY post about the disassembly of the CCM or Climate Control Module. I must note that my car is a 2002 model but this tutorial is similar to all model years.
So, let's begin. First off, you will need a bone tool, or, if you are like me and have none, use a credit card or gift card to unclip the pen holder under the CCM. There are 2 plastic clips that hold this piece of trim. I recommend, if you have manual transmission to put your car in second or 4th gear so that you have a little more space to maneuver.
After you have successfully removed this trim, you will find 4 T25 Torx screws. You will need to unscrew the ones that I have marked in the photo. The other 2 hold the gear lever trim in place
You are almost done. Now, you can pull the CCM using your hands like so. The CCM is still held in place by 2 clips that are attached to the HU. Using two fingers, each on opposite sides as a lever, you can lift and pull the CCM out.  

After you pull it out you will see 2 green pin connectors (already removed in the picture but marked with the green arrows) and another connector for the cigarette lighter (that one comes out pretty hard, you may want to use a flathead screwdriver as a lever to remove it).
Hope you'll find this information useful! 
Safe journeys, and see you next time!


Friday, May 9, 2014

Volvo S60 front bumper disassembly


Hello!
It's been a while. The people that follow this blog, know that a few months back I decided to close it. After some time thinking about how much work I invested and seeing that what I do here actually helps some people, I decided to bring the blog back

So, let's get cracking.
Today I decided to write about the steps necessary to take the front bumper off your car. As you may already know, I have changed my headlights (new post soon) so in order to remove them I had to take the front bumper off.

This procedure is easy. You start by taking off the bumper moldings. You can use a bone tool or your bare fingers if you are careful enough not to scratch the paint.

If you have a '00 - '04 front bumper model like mine, all you need is to pry the left and right moulding. The center one and even the license plate can remain on your bumper. However be careful not to pull too hard so you won't break the little clips holding the molding to to bumper.

Next step is removing the 6 plastic clips from under the hood. They can be removed easily by pressing them with a screwdriver. After you are done with whatever work you had to do with your bumper you can reuse them.
Next you have 1 torx T25 screw on both sides of the car under the wheel arch that need to be unscrewed . As you unscrew it make sure you push on it, this way it will push against a locking mechanism that is attached to the bracket that holds the bumper. 
Lastly there are two 10mm screws that need to be unscrewed and you are almost done. One is on the right hand side...
And the other on the left hand side
After all this unscrewing and pressing, it's time to take it off. I suggest you put some cloths or something soft under the front bumper before proceeding. The last part requires 2 persons because it is easier to slide the bumper off the brackets this way. I am not saying it can not be done by a single person, I'm just saying it is more difficult that way. 
After you have detached the bumper from the car, let it rest on the cloths, but be sure that you disconnect the fog lights (if equipped). The fog lights are very easy to take out of their housing. 
Done. Make sure to store the bumper out of your way and place it in as much of a natural position as possible to avoid warps or chips of the paint.
End result

It's good to be back! Safe journeys everyone! Don't forget to comment in the section below if you have any questions or ideas. I would love to read them! Hope this helped.