Showing posts with label S60. Show all posts

Saturday, July 26, 2014

Bling bling


Hello, my dear readers!

This time, I will tell you about something I did a few days ago. Finally, I found a pair of 2005+ "jewel" S60 tail lights and I went ahead and bought them. Also I bought a pair of 2007+ side mirrors with integrated side markers that I will cover in the next post. Here are the beauties:

The very next day I started the disassembly of my tail lights. This process is very easy. All you have to do is open the trunk and then release the cover on both sides using the knob.
Behind the " mystery " door we find this: the tail light assembly.
The tail light is held in place attached to the body via four 10mm bolts that are placed on the tail light's screws.
After you unscrew these bolts and remove both the connectors, you can pull the tail light away from the car.
Now comes the tricky part. You must understand that this job is not 100% plug and play. There are 2 things you must consider when you decide to do this kind of job. Firstly, when you buy the new tails, be sure you buy them complete with the electronic parts (the parts where the bulbs are fitted) because the electronics from the older type of lights will not fit. Secondly, you must know you have to modify the tail light a bit since the new one has a very long plastic guidance pin that will not allow it to fit your car (if your Volvo S60 is made pre 2005). 
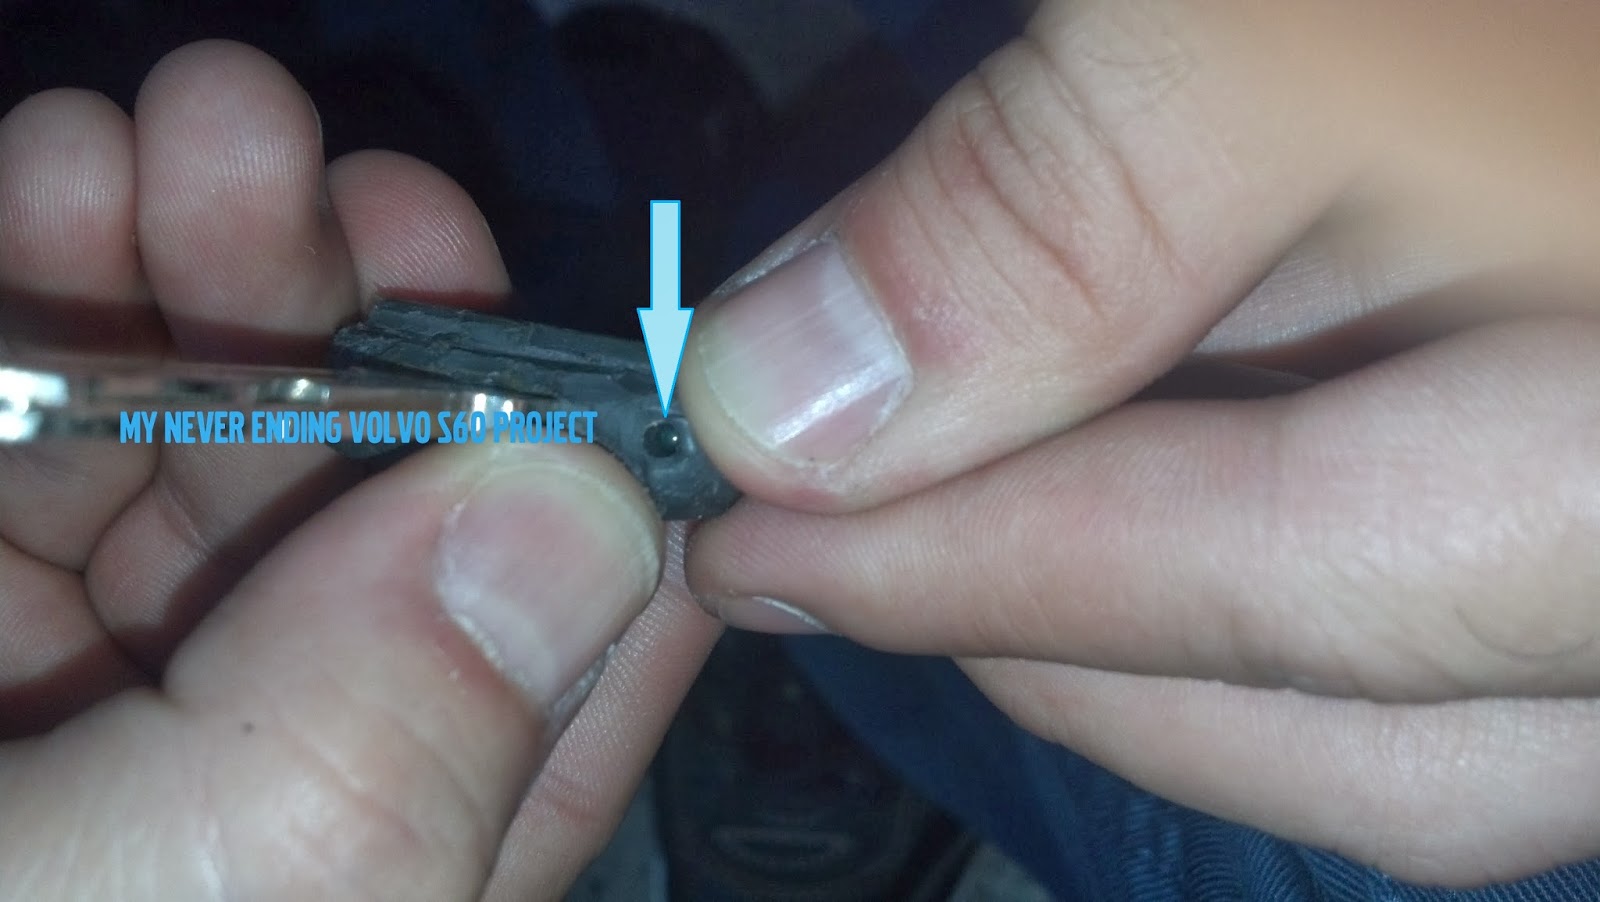
What you have to do, and what I did, was to cut the pin that you see in the picture above. However after you cut it, you are left with a hole.
So, I used some clear silicone to seal this hole so that when the cold and wet season comes, I will not have any "surprises"
 Until now I have showed you the work I did on only one headlight. But now, I show you the end result of "trimming" and sealing the pin and hole respectively, at the other light.
Almost done, now all I had to do, after the silicone was dry, is to assemble my new jewels back on the car.
One last note, the connectors fit perfectly with the electronics of the new tails, so no worries there.
Hope you like the result and maybe, who knows, you will do this kind of conversion to your car also.

Safe journeys everyone!


Friday, May 9, 2014

Volvo S60 front bumper disassembly


Hello!
It's been a while. The people that follow this blog, know that a few months back I decided to close it. After some time thinking about how much work I invested and seeing that what I do here actually helps some people, I decided to bring the blog back

So, let's get cracking.
Today I decided to write about the steps necessary to take the front bumper off your car. As you may already know, I have changed my headlights (new post soon) so in order to remove them I had to take the front bumper off.

This procedure is easy. You start by taking off the bumper moldings. You can use a bone tool or your bare fingers if you are careful enough not to scratch the paint.

If you have a '00 - '04 front bumper model like mine, all you need is to pry the left and right moulding. The center one and even the license plate can remain on your bumper. However be careful not to pull too hard so you won't break the little clips holding the molding to to bumper.

Next step is removing the 6 plastic clips from under the hood. They can be removed easily by pressing them with a screwdriver. After you are done with whatever work you had to do with your bumper you can reuse them.
Next you have 1 torx T25 screw on both sides of the car under the wheel arch that need to be unscrewed . As you unscrew it make sure you push on it, this way it will push against a locking mechanism that is attached to the bracket that holds the bumper. 
Lastly there are two 10mm screws that need to be unscrewed and you are almost done. One is on the right hand side...
And the other on the left hand side
After all this unscrewing and pressing, it's time to take it off. I suggest you put some cloths or something soft under the front bumper before proceeding. The last part requires 2 persons because it is easier to slide the bumper off the brackets this way. I am not saying it can not be done by a single person, I'm just saying it is more difficult that way. 
After you have detached the bumper from the car, let it rest on the cloths, but be sure that you disconnect the fog lights (if equipped). The fog lights are very easy to take out of their housing. 
Done. Make sure to store the bumper out of your way and place it in as much of a natural position as possible to avoid warps or chips of the paint.
End result

It's good to be back! Safe journeys everyone! Don't forget to comment in the section below if you have any questions or ideas. I would love to read them! Hope this helped.


Friday, October 25, 2013

The key switch

Hi all!
Today I will post about what I changed yesterday. For years I've been yearning to get my hands on a Switchblade style key fob for my Volvo. So I finally decided to buy a complete case with an uncut blade from ebay.It was cheap, about 30 $. Normally I would have made another post with the unboxing of the key, but this time, I didn't really like the seller so I will not do such a post and will not recommend him because the delivery took more than a month. The key is very nice and functional, but the wait was terrible.

So let's get down to business:
Here's the new uncut key next to my old key. Notice to the left there is a small screw that came with the new key.
So what I did first was to disassemble the new key completely and take the uncut key out. I bought this type of case which is not OEM, it is a replica, because it can be dismantled completely  and therefore I can use all the electronic parts from my old fob in it, therefore, after all the process is done, I have a working key, without having the need to go to the dealer and program it.
If you choose to go the same way I did, when you try to take out the key, pry apart the 2 plastic parts holding the key gently, because there is a spring inside.
I got the key cut at a specialised store (I was surprised how little it was, about 3-4$)
My old key again, with the blade (now cut) and the top part of the key fob
And a quick reassembly of the top part holding the cut key (just to test how difficult it is)
This key case I bought didn't come with any electronics. So it was up to me to insert my electronics from my key. First I started with the easy task of switching the motherboard. It is very easy to do. You only have one 8T torx screw that holds your remote in place. Unscrew, and separate gently.
Here you can see the remote electronic board moved it the new remote.
I also transferred the metallic contact for the battery from my old remote, the new one didn't had one but has a place where it fits perfectly.
Now the next challenge: To get the transponder out of my original key and into the new one. Note: without the transponder chip, your new key will open your car and turn on the ignition but the engine will not start and you will get a fault code.
Here is where the transponder chip will fit.
Now... where can it be? WARNING (Slasher movie pics following)
For this part I had the aid of my brother in law. So, where to cut first? I decided to cut on the left side of the key when holding the key with the manufacturer stamp up. Basically, on one side of my key is stamped Valeo (manufacturer) and on the other is Made in (somewhere). And after a few slices, in the other parts of the key, because I couldn't find any references as to where the chip is located, I started going deeper in the original place where I started cutting.
 So I passed the soft plastic layer, then a hard plastic, and going deeper I found another layer of soft plastic.
Blue arrow soft plastic, green arrow hard plastic
That moment I knew we found it. So we started cutting the top side of the plastic to find a hole to get it out and sure enough, after a few layers of plastic here it was:
I also took another picture with flash on so that you can see better the glass case of the chip
Here is the transponder chip located. Picture taken after I removed the soft plastic cover using only my finger nails so not to accidentally destroy the transponder
Using a wooden toothpick I pried the transponder chip out noting the position.
 After all this, I placed the transponder in the new casing where I showed you, reassembled the key, and voila: new switchblade key fob conversion completed.
Final result:
The upper part of the new key fob (the one holding the key, transponder, spring and the silver button) will need to be glued shut so that it will not accidentally dismantle when you turn the key in the ignition.

Hope you liked what you've read. If you consider doing this yourself and find yourself in trouble, or if you need advice, or if you just want to share opinions, please use the comment section below. 


.


Tuesday, April 2, 2013

Let's talk about rings, baby

As you may have already read my first unboxing post, you know already that I purchased a set of chrome dial rings. Well, i installed them (you can follow all the steps of the installation here and all the steps about how to disassemble the instrument cluster here). The look is amazing. I can not state enough how much an improvement. Watch for yourselves:
 picture with flash, 
 picture without flash
 contact. WOW factor
 artistic closeups
 another
My ending thoughts: definitely worth the price of the rings, and the labor. Love it.
Hope you like the final result. Tell me what you think.
Safe journeys everyone

Sunday, March 31, 2013

Volvo S60 DIM disassembly

A big hi to all my readers! When I created this blog, I had one thing in mind, that being sharing with all of you my ideas of possible upgrades to my Volvo S60, and also to help my readers when they begin their projects. Each time I upgrade something from now on, I will also try to post a tutorial. That being said, I now open the DIY Tutorials section, with my first tutorial regarding Volvo S60s DIM or Data Information Module (the instrument cluster) disassembly.
My first step when I start a project involving the electrical equipment is always to take of the leads to my battery. However, considering that the Volvo S60 has the battery in the trunk, and under a plastic shield which is rather hard to take out without taking out the spare wheel, I disconnect the leads under the hood.
You can find them under a small plastic door attached to the fuses box. Unscrew the bolt and you are good to go.
Secondly, go in the car and place the steering column in the most outward and downward position. If you have small hands and are confident that you will not scratch your cars trim you can skip this step, but bear in mind that the work space for this project is pretty small.
Now we start taking out the outer plastic rim surrounding the DIM. You need a firm but soft hand. All you need to do is to pull outward and up the rim using both your hands witch you place on the upper side of this plastic rim.
After you did this, your dashboard should look like in the picture above. Now, the bottom part of the plastic rim is taken out in a similar fashion. You place your hands right above the steering column and place your fingers in the small opening just above it. With a firm upward pull, you should have now disconnected the plastic rim. 
Final note about the plastic rim. It will still be attached with 3 evenly distributed plastic clips against the small plastic cover of the steering wheel (picture below)
Pull them out gently, and your done. Now, your dashboard should look like this. The DIM is fixated with 4 torx T25 screws. Yes, there is a lot of dust in there too, mainly because, I never taken the DIM out before and the car is 10 years old, and secondly, I'm sorry to say there is a lot of dust in Romania.
 2 T25 screws on the right.
  and another 2 T25 screws on the left.
All you need to do is to unscrew them. Careful not to drop the screws. You're almost done. Next, pull gently the DIM out and place it face down against the steering wheel like in the picture below.
Find the green DIM connector located approximately in the middle of the clusters back panel. You can already see it in the picture above, and the next pictures below.
 Now disconnect it by pressing the small protuberance on it and pulling it out.
You have now successfully disconnected your DIM.

Part 2 of the project is how to take apart the DIM.
The DIM is composed of 3 parts that are attached together by plastic clips. There is the electronics part which is located in the white plastic casing, the black plastic casing which is the part where all the kph and revs, etc are painted upon and the final part is the lens. Using a Flathead screwdriver you can gently separate them. As you can see in the picture below, there are 3 black clips and 4 transparent clips on the bottom which have to be undone.
 On the upper side of the DIM there are another 3 clips that hold the white electronics part. Undo them gently. Now you have access to the electronics module.
 lifting the lens and black trim of the instrument cluster.
 The lens is attached to the black plastic part by 5 transparent clips. Undo them gently, and be careful about the center one, I broke a sweat trying to remove it
Well, that's about it. Now your DIM is disassembled. To reassemble it, press all the parts carefully back, and follow all the steps back. Don't forget to reattach the green connector and the leads to the battery and your all done.
I wish to thank my brother-in-law for helping me (you can check his games site if you like) and, of course my fiancee for cleaning up inside the car where all the dust was (check her cosmetics website or her blog)

Well, I hope everything was clear and helpful. If you encounter problems, contact me or write me a comment. Also if you like my work, keep reading and let me in your ideas by writing a comment below.

Till next time, safe journeys!